


It can be a shock, when you become a homeowner, to find that there are many important things that come along with the deed to your home — chores and responsibilities that you didn’t learn about from renting.
From the mundane (where do I turn off the water to my home?) to the monumental (what’s a property line and where is mine?), you’ll encounter plenty of new stuff that no one is born knowing.
Here, to catch you up, are a handful of basic how-tos to help new homeowners get on their feet — and for veteran homeowners to make sure they know, too.
1. Find your property line

Your property “line” is the physical description of the boundaries of your piece of real estate.
You’ll need to know where your property lines are so you can avoid accidentally encroaching on a neighbor’s property. Awareness of your boundaries helps you avoid disputes that can even lead to legal conflicts, says Quicken Loans.
To obtain a professional description of your lot lines, hire a surveyor to locate and mark them. But you can get an idea — if not a precise one — by:
- Walking the edges of your property looking for markers placed by a surveyor or developer
- Checking your home’s deed for a description of the property lines
- Visiting your county assessor’s or recorder’s office and county government website to see deeds, surveys, maps and other information
- Consulting Google Maps for a rough idea of your property’s limits
2. Keep records of home improvement expenses

Experienced homeowners typically keep records — on paper or in an electronic folder — of receipts, documents and notes as they upgrade their property.
Improvements you make may help minimize capital gains taxes when you sell the home since these can increase your home’s “cost basis,” or its value for tax purposes. A higher basis lets you reduce your taxable profit, lowering the tax you owe, explains TurboTax.
Qualifying improvements might be things like a new roof, air-conditioning or heating system, storm windows, home addition, water heater or security system. Ask your tax advisor what qualifies and how to proceed.
3. Locate your water main shut-off
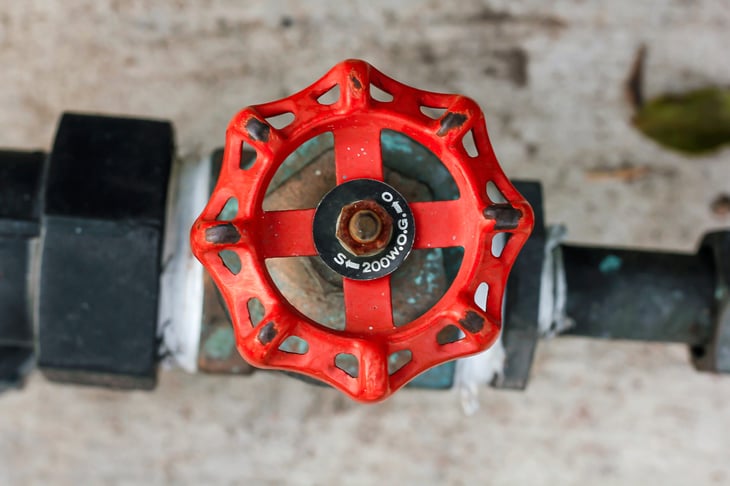
In case of a water leak, earthquake or other emergency, you may have to act fast to turn off the water supply from the street to your home.

To start, locate your water meter, since “the main water shut-off valve is usually close to it,” says this video from Dutton Plumbing, in Simi Valley, California, which shows how to find the water meter and shut off your home’s water supply.
4. Call 811 before digging

Buried utility lines are everywhere — beneath streets, homes and gardens. Whether you are digging a garden, excavating for a home improvement or installing a fence, you should dial 811 before you dig.
“Hitting a buried line while digging can disrupt utility service, cost money to repair, or cause serious injury or death,” according to the 811.com site, maintained by the Common Ground Alliance of industry professionals.
So, how does this work? When you call 811 (or make a request online), you alert local utility companies of your plan to dig. They’ll show up at your property to mark the location of underground utility lines with flags or paint.
The national website connects homeowners to their state regulations and information, including the time window you must give utility providers to mark the site. And here’s an important tip: Don’t dig above or within 18 to 24 inches on all sides of the marked areas.
5. Know when, how and why to get a building permit

Cities and counties issue building permits to manage safety at a construction site and make sure that work is done to local and other government standards.
You may face fines and penalties by building without a permit. What’s more, when you sell the home, a building inspection is required. That inspection could spotlight work that was done without permits, causing big headaches for you or interfering with the sale.
Every municipality has its rules. Redfin lists projects that typically need a permit, including structural changes, plumbing or electrical work, a new window, fixing or building a fence, additions and changes to the home’s structure.
6. Create a fire escape plan

House fires spread super quickly. You may have as few as one to two minutes from the first beep of a smoke alarm to get out safely. Nowhere does planning matter more.
The National Fire Protection Association tells how to create a plan in advance so that everyone in your home knows where to find a safe exit in an emergency, where to find and how to use escape ladders, how to keep exits and escape routes free and clear and how to hold a fire drill twice yearly to practice.
Also take a look at “4 Things To Clean Before Your House Burns Down.”
7. Assess your radon exposure risk

Radon is a naturally occurring radioactive gas. It’s found across the U.S. Although you can’t see it or smell it, it is the second-leading cause of lung cancer and the leading cause for non-smokers.
You can check your state’s radon map for the general risk where you live. But you’re not done there. You must test for radon to learn your real risk.
“Living in higher risk geological areas doesn’t guarantee your home will have high levels of radon and living in lower risk geological areas doesn’t guarantee your home will have low levels of radon,” says the Washington State Department of Health.
Testing is simple and relatively cheap. A test kit might contain, for example, a small canister or bottle. You’d leave it open to the air for a time and then seal it up and send it to a lab for analysis. At Amazon, for instance, kits (including analysis) start at under $50.
If your home’s levels are unsafe, you can hire a radon mitigation contractor to fix the home. Costs can vary, so shop around and get estimates from a variety of contractors.
8. Clean your dryer vent
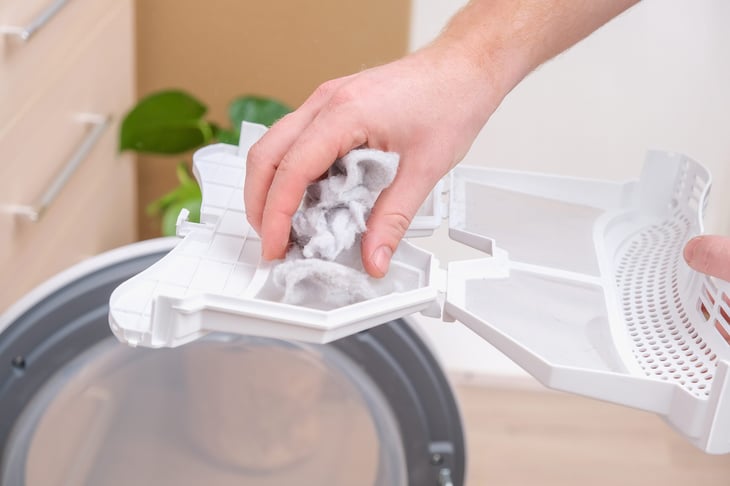
Dryer lint is a common cause of house fires.
Don’t let lint build up. Keep your family safe by getting in the habit of removing all the lint from your dryer’s lint trap every time you use the dryer.
If your load is still damp at the end of a cycle (or if clothes are taking longer to dry), your exhaust duct probably is blocked, says Texas Co-op Power.
In addition, routinely clean out the hose that carries warm (and potentially lint-laden) air from the dryer to the vent on the outside of your home. Learn how to clean and inspect your dryer’s hose and vent in “Higher Electric Bill? It Might Be Time to Clean This.”
Add a Comment
Our Policy: We welcome relevant and respectful comments in order to foster healthy and informative discussions. All other comments may be removed. Comments with links are automatically held for moderation.